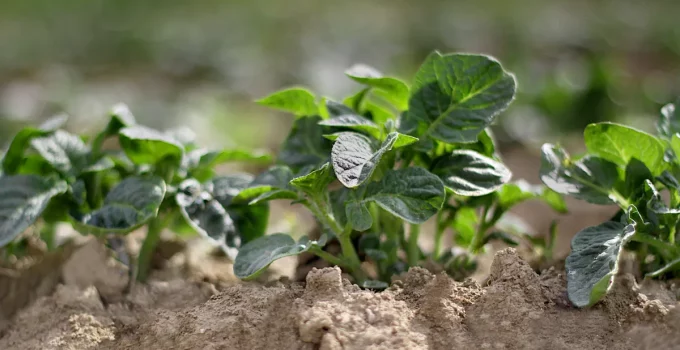
My guide on how to plant sprouted potatoes will be very simple. In fact, everything about planting newly sprouted potatoes is easy to learn, even if this is your first attempt at growing potatoes.
Whether you want to grow a potato crop in the garden in traditional rows, in raised garden beds or in containers, this guide will apply to all these growing methods.
We can also grow hydroponic potatoes but that’s a bit more complicated so I prefer soil cultures for these tuber vegetables.
The important thing I want you to take away from my guide, besides the actual steps for planting sprouted potatoes, is that these plants can be grown in containers and give a very good yield. Even people with limited space should give it a try. Vegetables grown by our own hands are always the tastiest.
Table of Contents
How to Plant Sprouted Potatoes in 6 Steps
You can grow potato plants from store-bought sprouted potatoes. But I also want to talk about seed tubers and whether you should buy them from nurseries or not.
If you’re not interested in that discussion and you already know which sprouted tubers you’re going to use, skip directly to step 2 where the fun begins.
1. Seed tubers vs store-bought sprouted potatoes
Usually, potato plants are grown from seed tubers (seed potatoes). It wouldn’t be a complete guide on how to plant sprouted potatoes if we wouldn’t be talking about seed tubers.
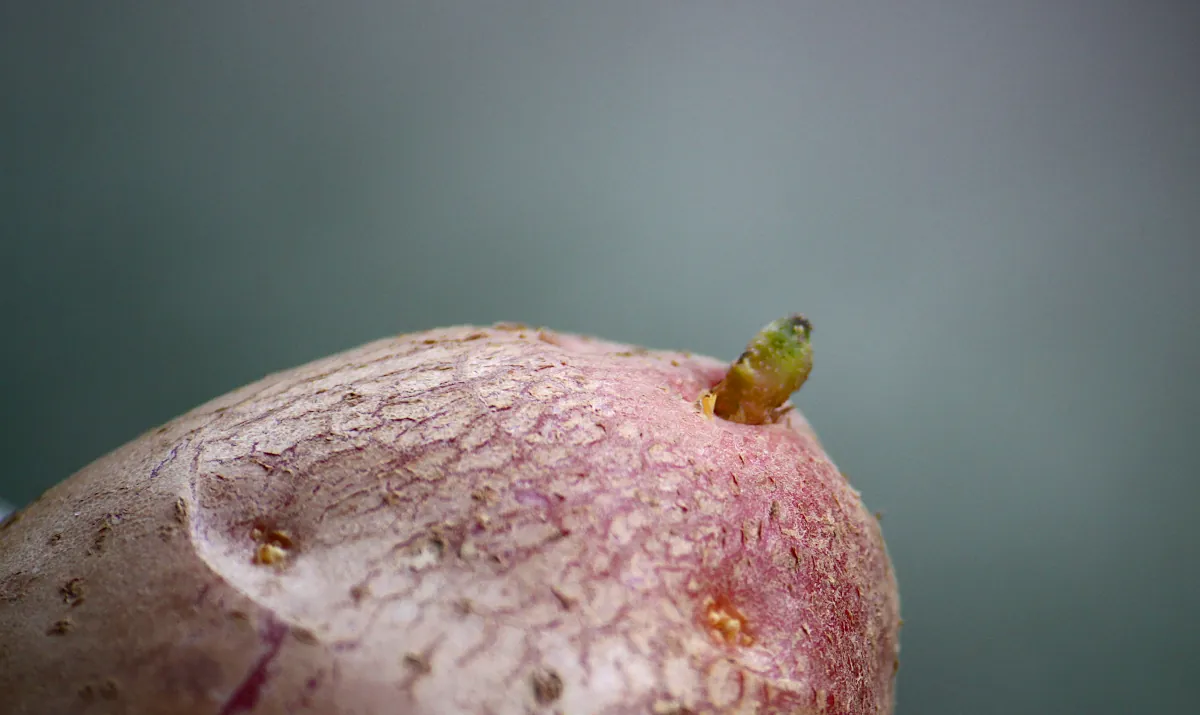
Seed tubers are small potatoes that have tiny growing points on them. These growing points are also called eyes.
If you buy them from a nursery, the eyes have not grown into full big sprouts but they will.
Seed tubers are pretty much the same thing as sprouted potatoes with a few differences.
The important thing they have in common is that both have the ability to grow a new plant from their sprouts.
If the tuber doesn’t have potato eyes or sprouts, then the new plant won’t grow.
We can buy seed tubers from a nursery to grow our new plants. The nursery will package seed tubers that have about the same size. They’re quite small, pretty and they’re very easy to handle.
Or we can grow potato plants from store-bought potatoes that have sprouted after being left in a cool dark place.
If you want to speed up the sprouting process, you can also place onions or apples near the tubers. You can add a moist rag or damp leaves if you want to prevent the tubers from becoming dried out.
Can you grow potatoes from store-bought sprouted potatoes?
You can but you must also consider that store-bought potatoes have been treated to actually prevent sprouting.
However, if your store-bought tubers get lots of eyes and sprouts then you’re ready to use them for growing new plants.
In my experience, store-bought potatoes will always sprout after a certain amount of time. It just depends how long it will take until their eyes appear.
You could also buy organic potatoes to sprout if organic is more of your thing.
Another thing you must be aware of is that store-bought potatoes can introduce disease into our garden. If we’re growing in containers that’s not a problem because we can simply get rid of the ruined soil.
I wouldn’t say that my warning has a high possibility of coming true but you need to know all aspects so that you know what might happen.
Do I absolutely encourage you to buy seed tubers?
In general, I don’t encourage people to buy seed tubers.
If you don’t want to spend money on buying seed tubers and you have a few sprouted potatoes already, then you should plant those.
I especially don’t think that you should buy seed tubers if you just want to grow a few potato plants.
If you’re planning on growing a very large crop in the garden in traditional rows, then I think it would be worth buying seed tubers. You could actually buy a few different varieties if you have the space for them.
Thus, I encourage people buying seed tubers if they’re looking for specific varieties and if they want to grow a very big crop. Then, it’s worth it.
Another advantage is that we get to pick disease-free, certified seed potatoes.
Each season, I plant sprouted potatoes from my previous crop. That’s what you can do after you manage to grow your very first crop. All you need is to save a few potatoes and let them grow eyes and sprouts.
2. When to plant
If you’re growing indoors in containers or bags then you can do it anytime, especially if you have grow lights. If you’re growing under grow lights, run them 14-16 hours each day.
Potatoes enjoy full sun. And moisture
Outdoors, you can plant as soon as the soil warms, in early spring.
These tubers grow best in a 50-70 degrees F temperature range.
They make a good spring crop but also a good fall crop.
It’s not far-fetched to say that in a maritime climate we could grow year-round.
3. Best Soil for planting sprouted potatoes
Any guide on how to plant sprouted potatoes should contain pertinent soil information.
Before planting our sprouted potatoes we must talk about which soil is best for potatoes and what preparations we must do, depending on where we’re planting the sprouted potatoes or seed tubers.
The best soil for potatoes is well-drained sandy soil. Add lots of compost in the fall or early winter the year before the crop.
Add compost before planting, too. As you heap up soil on the growing potato plants, you can incorporate compost into that, too
If you’re growing in containers, you can add a small amount of compost at the bottom of the container before planting.
More compost can be periodically layered in the container as we pile soil at the base of the plant. You can add straw to compost.
If you grow in the garden
Dig trenches about 4-6 inches deep and 2 feet apart.
Mound up the soil in between the rows because that’s the topsoil covering the sprouted potatoes.
As the potato plants continue to grow, you’ll also create a hill around the plant with loose soil.
If you grow in raised garden beds
I would recommend growing fingerling potatoes (Swedish Peanut Fingerling) in garden beds because they grow into smaller tubers so you can have a satisfying yield in a small space. The same applies to growing in containers.

The only thing you should know about how to plant sprouted potatoes in raised garden beds is that you need beds that are at least 12 inches deep.
The soil in your garden beds should have plenty of compost.
Moreover, position your bed so that it receives at least 4-6 hours of sunlight per day.
Plant the sprouted potatoes/seed tubers in a 3 inch deep furrow 12 inches apart.
Cover with 4 inches of loose soil.
If you need to know more about growing in raised garden beds, check out this helpful guide.
Where to Buy?
Check Price and User Reviews Here
If you grow in containers/grow bags

You need large pots or containers. Fabric grow bags are some of the cheapest and the best.
The pot should have an at least 16 inches diameter if you want a bountiful yield.
In a 5-gallon grow bag you can plant 2 seed potatoes or 2 cut pieces with sprouts.
In a 10-gallon grow bag you can grow 4-6 plants, meaning that you can plant 4-6 seed potatoes or 4-6 cut pieces with sprouts.
You can also buy even bigger grow bags for a bigger crop.
Fill in your container with 4 inches of soil.
We don’t fill up the container with soil at the time of planting because we will continue to add more and more soil and the plants continue to grow. The same thing we do when we grow in gardens and raised garden beds.
Each seed potato or sprouted potato should be spaced 8 inches apart.
Plant them and cover the tubers with 3 inches of soil.
You will continue to add more and more soil as the plants continue to grow. Start when the plant reaches 7-8 inches in height and do it twice more after that.
Where to Buy?
Check Price and User Reviews Here
4. Cut the sprouted potatoes if they’re bigger than an egg
If your sprouted potatoes are the size of an egg or smaller, then you plant it whole.
You don’t have to cut seed tubers because they’re only selected to be small.
However, store-bought sprouted potatoes can be very big, in which case we need to cut them. And with this information, we’re almost done with our guide on how to plant sprouted potatoes.
When you cut a sprouted potato, the only thing you need to keep in mind is that each piece should have at least 2 eyes or sprouts.
Thus, a very big sprouted potato can help you grow several plants.
5. Let the cuts sit out uncovered for 2-3 days
The cut pieces need to callus over so they don’t rot in the ground.
6. Plant the cut sprouted potatoes
If they’re cut pieces, plant them with the cut-side down, sprouts/eyes facing up.
If they’re seed tubers it doesn’t matter how you put them in the trenched soil.
How to Take Care of Potato Plants
Let’s quickly cover watering, piling loose soil around the base of the plants, fertilizing and harvesting.
1. Watering
Full sun and moist soil are the requirements to keep in mind after reading this guide on how to plant sprouted potatoes.
Water once/twice per week and make sure to soak the soil.
If you get 1 inch of rainfall per week that means you don’t have to water that week.
2. Hilling potatoes
Pile loose soil around each potato plant. This is extremely important and it’s done more than once throughout the growing season.
When the plants are 8 inches high, pile more loose soil + compost around each plant. Pile until only the top 4 inches of each shoot is showing.
Repeat this process 2 times more as the growing season carries on. You can repeat as soon as two weeks after the first hilling of soil + compost.
This is done to increase yield.
3. Fertilizing potatoes

Potatoes will need more fertilizer than other vegetables. That’s why I mentioned that you can add compost as you pile loose soil around the base of the potato plants.
Of course, you can also use fertilizer.
I recommend using a tomato fertilizer, which is lower in nitrogen but higher in phosphorus and potassium for feeding potato plants. The nutritional needs for these two plants are quite similar, that’s why that’s my top recommendation.
Or use a balanced organic fertilizer.
Where to Buy?
Check Price and User Reviews Here
4. Harvesting
If you want to harvest new potatoes, do it around the time the plants flower. You can do so by reaching your hand into the soil under the plants, picking a few. Let the others mature.
You can harvest when the plants have dried or the tubers have reached full size. That can happen about 3 months after planting but it depends on the variety you’re growing.
Late maturing tubers store the best.
Those who grow in a container will have the easiest harvesting because you can just dump over the whole content of the fabric bag. Your potatoes will come out intact.
For the garden or garden beds crops, you need a tool to dig the soil. You can use shovels or spades. A pitchfork is the tool that works best for digging out potatoes, if you have one.
If you cut any potatoes, separate them from the rest and make sure to cook them as soon as possible.
The other dug tubers that are free of cuts or blemishes should be cleaned up of dirt but not washed. Store them in a dry, cool place. Ideal storage temperatures are between 45 to 55 degrees F.
And that’s about everything you need to know about how to plant sprouted potatoes in the garden, in raised garden beds or in containers.


")